How to Size a Jump Rope: Static Fit and Dynamic Test
There is no universal jump-rope length formula for every rope and skill. Start with the manufacturer's size chart or fitting method, then test the rope at low speed. Rope construction, handle connection, skill level, and purpose all change the usable length.
The familiar “height plus 3 feet” rule can be a rough starting point for some general-purpose ropes, but it should not override the product's instructions.
Start With a Static Fit Check
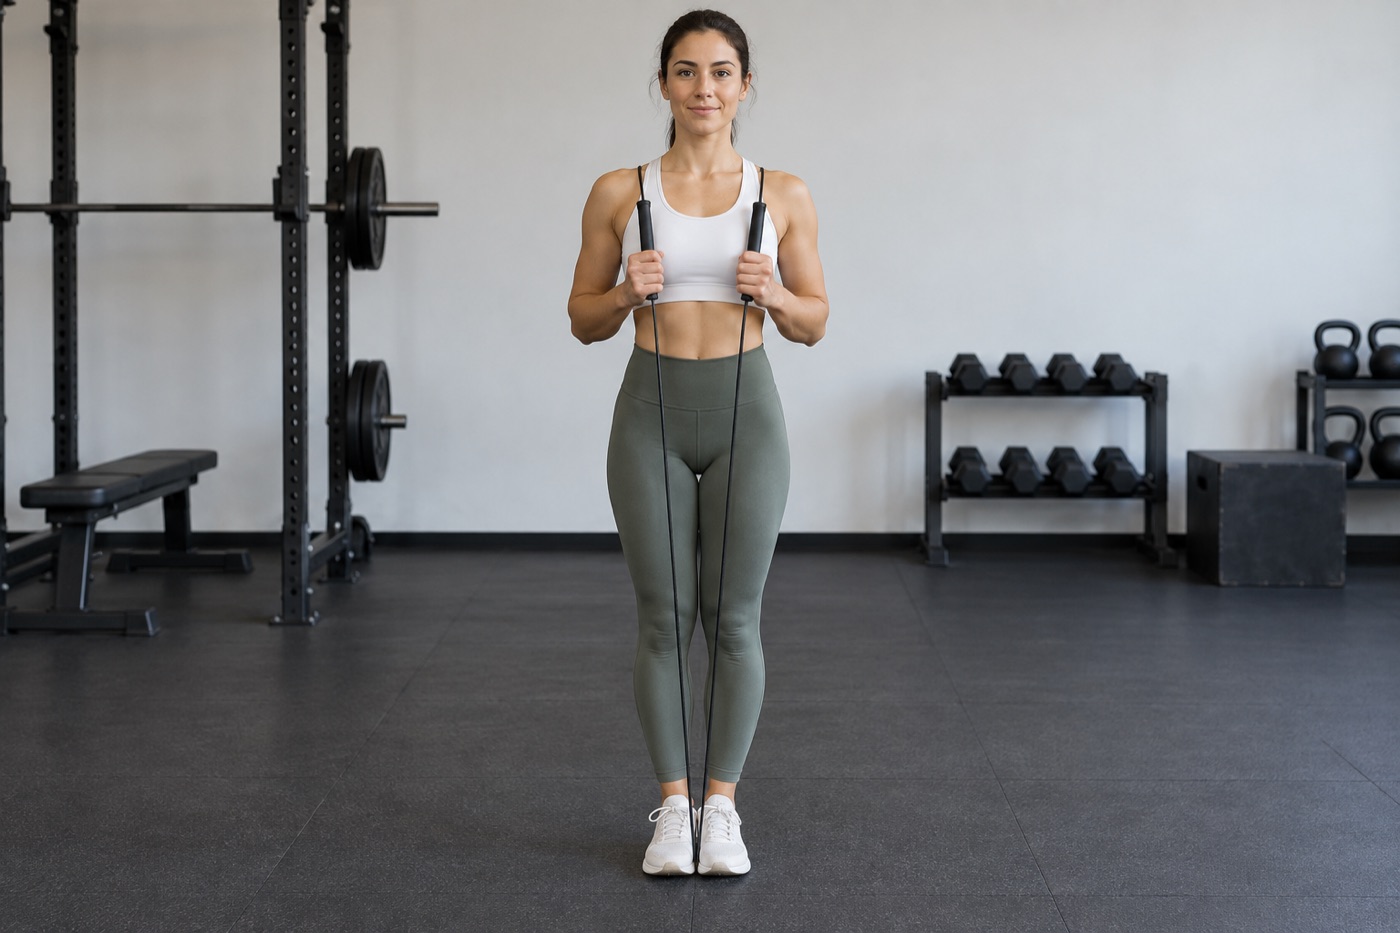
- Wear the shoes you normally use and stand tall with feet together.
- Place one foot on the rope's midpoint without stretching the cable.
- Bring the rope ends straight upward with equal tension.
- Measure where the cable ends or handle connection points reach—not necessarily the tops of long handles.
- Compare that position with the maker's instructions. For one adjustable Rogue speed-rope system, the published starting point is around the sternum or lower pectorals; another product may differ.
Let Rope Type Override Generic Advice
| Rope type | Starting approach | Why it differs |
|---|---|---|
| Adjustable speed cable | Use the brand method, leave excess, then test | Small length changes strongly affect cadence and clearance |
| PVC fitness or freestyle | Allow the length needed for the intended skills | Beginners and crossing skills may benefit from more clearance |
| Beaded rope | Follow the maker's chart and test arc shape | Beads add feedback and can support freestyle timing |
| Fixed-length weighted rope | Choose the manufacturer height range | Construction and handle system usually cannot be safely trimmed |
| Child's rope | Use the brand range and supervise the dynamic test | Rapid growth and trip risk favor adjustability |
Run a Slow Dynamic Test
- Move to a level, nonslip surface with clear overhead and side space.
- Keep elbows near your sides and turn from the wrists rather than making large arm circles.
- Perform 10 to 20 slow single bounces.
- Listen and look for a light ground contact slightly in front of your toes.
- Repeat after a brief rest. Change only one side or one small increment at a time if the rope is adjustable.
A correct static measurement can still feel wrong if technique is inconsistent. Film a few jumps from the front and side before cutting cable.
Too Long or Too Short?
| Clue | Possible cause | Check before resizing |
|---|---|---|
| Rope slaps far in front or bounces twice | Often too long | Hands drifting wide, slow wrists, soft surface |
| Large loop passes high overhead | Often too long | Shoulders lifting or arms circling |
| Repeated toe catches | May be too short | Jump timing, bent wrists, hands moving behind hips |
| Must raise hands to clear feet | Often too short | Whether both sides are equal |
| One side catches | Unequal adjustment or hand position | Match cable length and grip height |
| Works slowly but not at speed | Length or technique may need refinement | Reduce speed and film before trimming |
Trim Only After Several Tests
Keep removable excess cable during early sessions if the design allows it. Test on more than one day and with your normal shoes. Once shortened, confirm both sides remain equal and reinstall every cap, collar, or fastener exactly as instructed.
Do not cut a coated cable with random household tools if the maker specifies cutters, and do not modify a fixed-length weighted rope. Frayed wire, loose stops, cracked handles, or a cable that pulls out of its connection requires repair or replacement before use.
Clear the Practice Area
Use a flat surface with enough clearance for the rope arc, keep people and pets outside the swing radius, and stop if the cable or handle is damaged. Start with short bouts. Pain, dizziness, unusual shortness of breath, or repeated loss of balance is a reason to stop rather than solve the problem by changing rope length.
Sources and Manufacturer Guidance
Requirements can vary by product, model, and situation. These primary sources informed this guide; official instructions for your exact product and current authoritative guidance take priority.
Frequently Asked Questions
-
Use the specific manufacturer's chart first. Height-plus formulas are only rough starting points because rope type, handle design, and skill change the useful length.
-
Measure the point the maker specifies—often the cable ends or handle connections, not handle tops. Some speed-rope instructions start around the sternum or lower chest.
-
A light contact just in front of the feet is a useful dynamic cue. Heavy slapping or a large rebound often suggests excess length or inefficient hand position.
-
A little extra clearance can help, but too much creates drag and poor timing. Preserve adjustability and shorten gradually as technique improves.